

Significant Robot VPN System Update - April 15, 2021
Are you wishing you could program and drive your robot over the internet? Many FIRST FRC teams are not able to work on or practice with their robots due to the COVID-19 pandemic. There are also times that students far away from their workshops, or even team sponsors, would like to drive their robot but it cannot be brought to them.
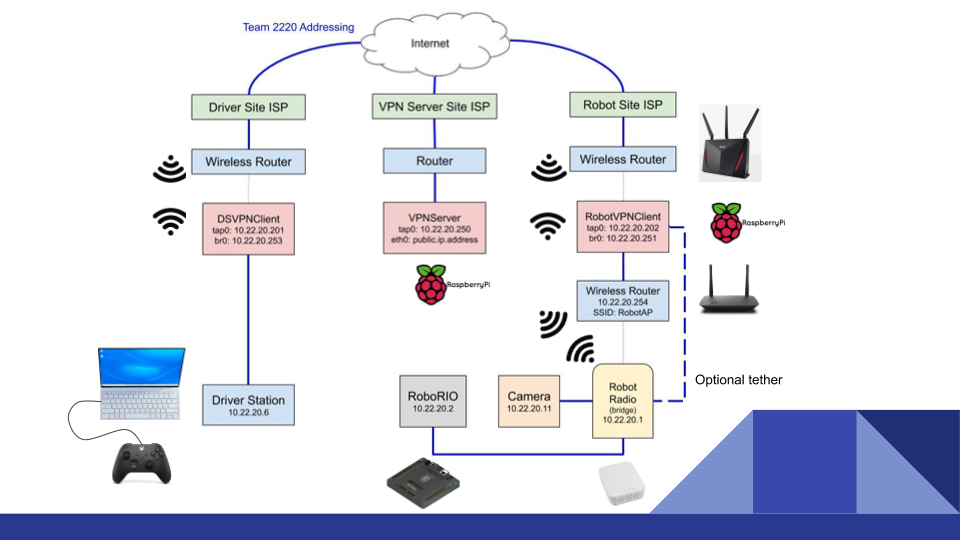
Team 2220 Blue Twilight developed a way to program and drive a robot remotely. Their solution involves inexpensive Raspberry Pi to create a site-to-site Virtual Private Network (VPN) with no modifications to the robot or driver’s station required, and the system can work using a cell phone as a hotspot when no WiFi is available. 2220’s European sister team 5883 even successfully drove a robot in Minnesota with their driver almost 5,000 miles away in Poland.
The Robot VPN system has been in development since the summer of 2020 but a significant user update was made April 15, 2021. After analyzing feedback from various teams already using the Robot VPN system, Team 2220 made set up much easier by writing automated scripts so most manual commands are eliminated, and total software set up time for the VPN system has been reduced to under 45 minutes. Check out this step-by-step guide on how you can set up the Robot VPN system for your team. Contact us at team2220@eaganrobotics.com if you have questions.
Introduction
Two of the biggest challenges faced by FIRST Robotics teams during the pandemic are not meeting in person with your team and the limited ability to program and drive your robot. Meeting with our team was solved through the use of Zoom. We also found a solution to the second challenge. A site-to-site VPN (Virtual Private Network) can be deployed in order to allow you to program and drive your robot from any remote location (e.g. a student’s home). Through this webpage, we will give you a thorough and easy to follow plan on how to set this up yourself.
Setting up a site-to-site VPN
To set up a site-to-site VPN you will need to follow these basic steps which are all outlined in detail in the supporting documentation collection (linked at the bottom of this page):
- Obtain needed hardware
- Download and install software
- Set up VPN software and configuration
- Configure the Auxiliary Wireless Router and Robot Radio
- Distribute the VPN server and clients to the desired remote sites
- Test VPN connectivity
- Program and drive your robot!
Safety Tips
- We strongly recommend that for safety, a minimum of two people remain in the room where the robot is operating.
- Due to the weight of an FRC robot (~125lbs plus battery), we also recommend that you have a minimum of two people available when lifting the robot. The lifters should wear gloves, safety glasses and verbally coordinate the lift and drop.
- Ensure that an appropriate fire extinguisher, battery spill kit and first aid kit are on hand with the robot. Check both for damage, adequate charge, and completeness.
- Have an emergency stop plan at the robot site (e.g. unplug power or network cable which will cause the robot to immediately halt). The standard E-stop capability is supported as well (SPACE bar on the driver station), but that is only available remotely.
- Equip your robot with one or more cameras (e.g. USB Lifecam) to give remote driver(s) added visibility. Consider keeping the resolution of these cameras to a minimum in order to minimize any additional network latency.
- Use a video conferencing solution (e.g. Zoom) to communicate between sites during robot operation to provide additional visibility for the remote driver(s). If possible, use a separate network (e.g. cellular hot-spot) from the one you’re using for the robot VPN.
- Use high-speed Internet connections to keep latency low (under 200ms) in order to provide maximum responsiveness to the driver(s).
Obtaining needed hardware
In order to extend your team’s robot network between remote locations you will need to get a few inexpensive parts readily available from places such as Amazon. The main component is called a Raspberry Pi which is a $35 mini computer that is capable of running a variant of the Linux operating system. Those computers become the heart of the VPN and essentially become network routing devices when connected and configured properly. For a complete list of the required hardware you can reference this document.
Download and Install Software
Once you have all of the necessary hardware you will need to download and install the Raspberry Pi OS (Operating System) and VPN software. Installing the OS involves Installing the Raspberry Pi OS Image on an SD card. Once the SD card is written, you insert it into a Raspberry Pi. Before powering up the Raspberry Pi, make sure you have a USB keyboard and mouse as well as an HDMI monitor connected to allow you to configure the OS, which is a one time step that should take less than 5 minutes. Repeat this step for each of the Raspberry Pi computers (one for the VPN server, two for the VPN clients).
Set up VPN Software and Configuration
The next step involves setting up the VPN software and configuration for each Raspberry Pi. This is handled by a script which you will load from a public Github repository using these instructions: Automated VPN Setup on a Raspberry Pi
Click here to expand older (manual) instructions
Set up the VPN Server
Next you will be setting up the Raspberry Pi to be designated as your VPN server. With the system booted up, bring up a terminal window (similar to the Windows Command Prompt) by clicking on the appropriate icon in the upper left corner of the desktop. You can then follow the instructions for Installing and Configuring OpenVPN. Once the server is fully set up, you will need to allow access to it from the Internet as follows: If your Pi is behind a router on a private IP address (typically 192.168.x.y), which is the typical situation, you will need to set up a port forwarding rule to forward UDP port 1194 from the router to the Pi running the OpenVPN server. If your Pi is connected directly to the Internet with a public IP address, you will need to ensure that UDP port 1194 is reachable. If not, you may need to open up that port on your firewall.
Set up the Robot VPN Client
Now that the VPN server is operational, you will need to install and configure the VPN client used at the robot site using the client setup portion of Installing and Configuring OpenVPN. You will additionally need to Configure Ethernet Bridging which will join (bridge) the VPN interface with the Ethernet interface on the Raspberry Pi.
Set up the Driver Station VPN client
Your last VPN client to set up is for the VPN client used at the driver station site, again using the client setup portion of Installing and Configuring OpenVPN. You will additionally need to Configure Ethernet Bridging which will join (bridge) the VPN interface with the Ethernet interface on the Raspberry Pi. That Ethernet interface is what the Driver Station plugs into.
Configure the Auxiliary Wireless Router and Robot Radio
To avoid having to tether your robot using an ethernet cable, you will need to Configure an Auxiliary Wireless Router (which plugs into the Raspberry Pi with an ethernet cable) as well as Configuring Your Robot Radio.
Distribute the VPN server and clients to the desired remote sites
Now that your VPN computers are completely set up, you will need to physically connect them at the remote sites. In particular:
- Connect the VPN server to a router at any site for which you have the ability to configure the wireless router. This is required in order for it to be reachable by the VPN clients.
- Connect the Robot VPN client using the Wi-Fi interface at the site where the robot is (typically in a school or warehouse where there is a large area to run the robot).
- Connect the Driver Station VPN client using the Wi-Fi interface at the site where the driver station is to be used (typically in a student’s home).
Start Up and Test VPN connectivity
Once the Raspberry Pi computers and related hardware is set up and booted you can test network connectivity between the sites following the steps in Setting up Robot VPN.
Program and drive your robot!
At this point you should be able to drive your robot remotely! Please be aware of safety precautions as the normal emergency stop capability will only be available to the remote driver, and not to those present at the robot site. In order to stop the robot at the robot site, you should be ready to easily disconnect the ethernet cable going to the wireless radio OR its power cable, both of which will cause the robot to stop.
Future Enhancements
- Support an optional configuration combining the VPN Server and the Robot VPN Client into a single Raspberry Pi.
- Expand from a team-specific to a multi-team VPN configuration which would allow for multiple teams to program/drive robots remotely using a single VPN introducing the possibility for standard 3-on-3 robot matches using the standard FIRST Field Management System (FMS).
- Adaptation for use with FTC.
Supplementary Resources
Supplementary Resources Linked below are some additional resources that you may find useful.
Among them are instructions for setting up a remote desktop environment (VNC) which can supplement the above by allowing remote participants to control the driver station laptop.